How to Make Felted Yarn from Pet Hair: A Step‑by‑Step DIY Guide to Crafting with Cat & Dog Fur
Creating felted yarn from the natural coats of cats and dogs offers a sustainable alternative to commercially produced fibers. This guide explains each phase of the process, from collecting hair to spinning the finished yarn, and demonstrates how to achieve professional results using modest tools.
Readers will learn how to prepare pet hair, how to card and blend the fibers, how to felt the blend, and how to spin the final yarn. The information is valuable because it reduces waste, provides a personal connection to the craft, and produces a unique material that can be used for accessories, toys, or charitable projects.
What You Will Need
- Collected pet hair (cleaned and free of debris)
- Carding brushes or hand cards
- Felting needles and a felting pad (recommended tools are listed below)
- Needle storage box
- Scissors, cleaning cloth, and finger protectors
- Spinning wheel or drop spindle
- Optional: a small amount of wool or alpaca fiber to improve loft
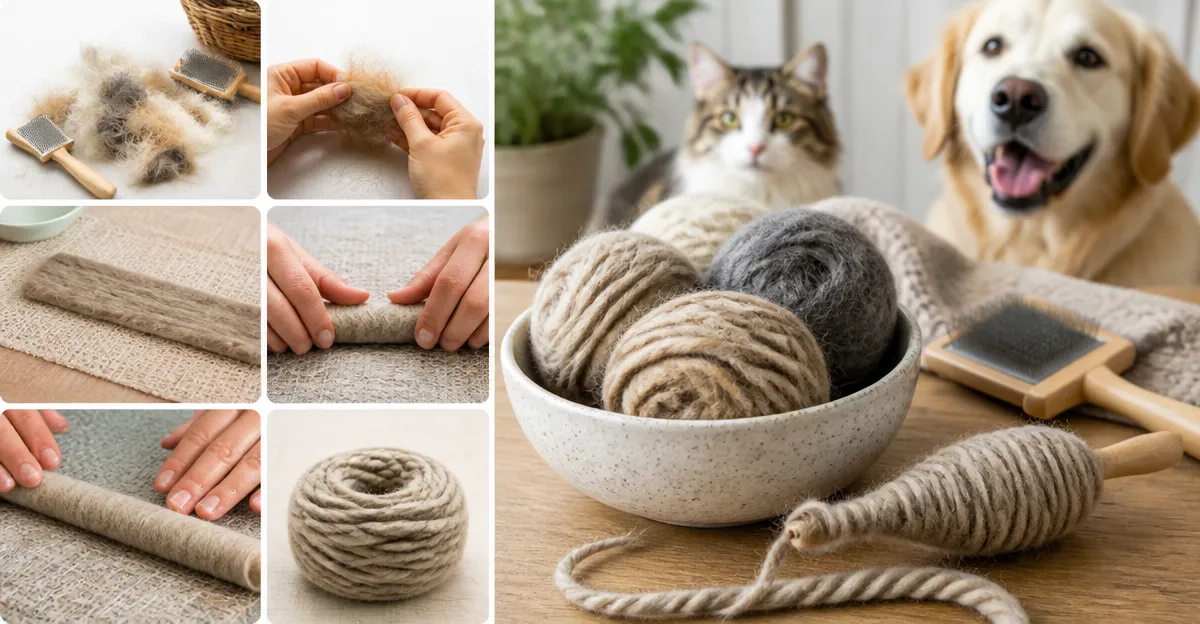
Step 1 – Collect and Clean the Pet Hair
The first step is to gather hair that has naturally shed during grooming or brushing. One should use a dedicated brush to avoid mixing hair with household lint. After collection, place the hair in a fine mesh bag and gently shake to remove loose debris. If the hair is oily, a brief wash with mild soap and thorough air‑drying will improve the felting quality.
It is essential to keep the hair completely dry before proceeding, because moisture interferes with the needle felting process. Once dry, separate the hair into piles based on length; longer strands can be blended with shorter ones to create a balanced yarn.
Step 2 – Prepare Your Felting Tools
Having reliable felting needles and a sturdy pad significantly reduces the time required to felt the fibers. The SOCNITC Felting Tool Set provides three gauge sizes (36, 38, 40) with thirty needles of each size, a 6×6‑inch felt pad, needle handles, a cleaning cloth, and finger cots. The larger 36‑gauge needles work quickly for initial shaping, while the fine 40‑gauge needles create a smooth surface, which is essential for a uniform yarn.
Using this comprehensive set ensures that the user does not need to purchase additional accessories, and the included storage bottles keep the needles organized and protected from rust. At a price of $18.97, the set offers a cost‑effective solution for beginners and experienced felters alike. Rating: N/A.
Step 3 – Card the Hair into a Loose Roving
Carding aligns the individual hairs so that they lay parallel and can be felt evenly. Spread a small amount of hair on a clean surface and use a hand card or a wide‑tooth brush to tease the fibers into a fluffy roving. If desired, blend a few teaspoons of wool to increase loft and improve needle penetration.
During this stage, maintain a consistent thickness across the roving; irregular thickness leads to uneven felting and weak spots in the final yarn. The roving should be approximately the width of a pencil and about two inches thick.
Step 4 – Begin Needle Felting the Roving
Place the roving on the 6×6‑inch felting pad included in the SOCNITC Felting Tool Set. Using the 36‑gauge needles, gently poke the fibers in a circular motion, working from the center outward. This action compresses the fibers and begins the interlocking process that creates felt.
After the initial bulk is formed, switch to the 38‑gauge needles to refine the shape and eliminate gaps. Finally, use the 40‑gauge needles to smooth the surface and achieve a uniform thickness. The included cleaning cloth can be used to wipe any oil residue from the needles, extending their lifespan.
Step 5 – Refine the Felted Strip and Cut into Yarn Lengths
Once the felted strip reaches the desired density, remove it from the pad and lay it flat on a clean surface. Use scissors to trim the edges, creating a neat rectangle that will be easier to spin. The trimmed strip should be about ¼‑inch thick; thicker sections will be difficult to draft on a spindle.
If the strip feels too stiff, gently re‑felting with the fine 40‑gauge needles will add softness without compromising structural integrity. The finger cots supplied with the tool set protect the hands during this repetitive motion.
Step 6 – Spin the Felted Yarn
Attach a small amount of the felted strip to a spinning wheel or a drop spindle. Draft the fibers slowly, allowing the felted fibers to twist together naturally. Because the fibers are already felted, the yarn will have a slightly firmer hand than traditional spun yarn, which is ideal for durable accessories.
Wind the spun yarn onto a bobbin or skein holder, and secure the end with a knot. The resulting yarn can be used immediately for knitting, crocheting, or weaving projects. If the yarn is uneven, a second brief felting session with the 38‑gauge needles can smooth out irregularities.
Tips & Pro Tips
- Work in a well‑ventilated area; fine fibers can become airborne during carding.
- Use the color‑coded needles from the Mayboos Needle Felting Kit to keep track of gauge size during the felting process.
- When mixing pet hair with wool, maintain a ratio of 70 % pet hair to 30 % wool for optimal loft.
- Store the finished yarn in a moisture‑proof container to prevent mildew.
Troubleshooting
Problem: The felted strip is too stiff and does not spin smoothly.
Solution: Re‑felting with the 40‑gauge needles will introduce additional softness. Adding a small amount of soft wool before the second felting stage also helps.
Problem: Needles become dull quickly.
Solution: Use the cleaning cloth after each felting session to remove rust‑preventing oil and store needles in the provided plastic bottles.
Conclusion
This guide has demonstrated how to transform ordinary cat or dog hair into a usable felted yarn, offering a sustainable and emotionally rewarding crafting experience. By following the outlined steps, using the recommended tools, and applying the provided tips, one can produce high‑quality yarn suitable for a variety of projects.
Readers are encouraged to experiment with different blends, gauge combinations, and color variations to create truly personalized fibers. The process not only reduces waste but also deepens the connection between pet ownership and creative expression.
Products Mentioned in This Guide
SOCNITC Felting Tool Set
Price: $18.97
Rating: N/A
Features: Includes 30 needles each of 36‑, 38‑, and 40‑gauge, a 6×6‑inch felt pad, three needle handles, scissors, cleaning cloth, finger cots, and storage bottles.
Mayboos Needle Felting Kit
Price: $18.97
Rating: N/A
Features: Provides 35 needles in four shapes (triangular, spiral, star, cone) across gauges 36‑, 38‑, 40‑, and 42‑, color‑coded for easy identification, and includes a storage box.
Frequently Asked Questions
How should I collect and clean pet hair before felting?
Gather loose hair from brushing or shedding, then wash it in mild detergent, rinse thoroughly, and let it dry completely to remove oils and debris.
What basic tools do I need to turn pet hair into felted yarn?
You’ll need clean pet hair, carding brushes or hand cards, felting needles with a pad, scissors, and a spinning wheel or drop spindle.
Can I blend pet hair with other fibers, and does it help?
Yes, adding a small amount of wool or alpaca improves loft, softness, and needleability of the finished yarn.
What are the main steps and how long does felting pet hair take?
After cleaning, card the fibers, layer them on a felting pad, needle‑felt until dense, then spin; the process usually takes a few hours depending on batch size.
Is felted pet‑hair yarn safe for making toys or accessories?
When fully felted and free of loose fibers, the yarn is durable and safe for pet‑friendly projects, but always supervise pets with handmade items.