Introduction
This guide explains how one can maintain robot vacuum sensors to prevent pet hair clogs, a common cause of navigation errors and reduced cleaning efficiency. One will learn why sensor cleanliness matters, which tools are most effective, and how to perform each maintenance step safely. Regular sensor care extends the device's operational lifespan and reduces the frequency of costly repairs. By following the systematic approach outlined below, one can ensure reliable performance even in households with heavy shedding pets.
What You'll Need
- A soft, anti‑static microfiber cloth.
- A set of precision cleaning brushes designed for vacuum rollers and sensors. The Midukit Vacuum Cleaning Kit provides a versatile collection of brushes, tweezers, and a cleaning cloth.
- A handheld brush for larger hair accumulations. The YurMemo Handheld Vacuum Brush is designed for cleaning rollers and can assist in removing bulk hair from the robot chassis.
- A small Phillips and flat‑head screwdriver (included in the Midukit kit).
- Compressed air canister (optional, for dislodging fine particles).
Step 1: Power Off and Unplug the Robot
Before any cleaning begins, ensure the robot vacuum is powered down and disconnected from its charging dock. This precaution eliminates the risk of accidental activation, which could damage delicate sensor components. One should also remove the battery if the model permits easy removal, thereby guaranteeing that no electrical current flows through the device during maintenance. After the unit is fully powered off, place it on a clean, static‑free work surface.
Step 2: Locate the Sensor Array
Modern robot vacuums typically feature an array of optical, infrared, and LiDAR sensors positioned around the perimeter and underneath the chassis. Consult the manufacturer’s service manual to identify the exact locations of the front‑facing optical sensor, cliff detection infrared sensor, and side‑mounted LiDAR unit. One should note that pet hair often accumulates in the narrow gaps surrounding these sensors, especially after prolonged cleaning cycles in homes with cats or dogs.
Step 3: Remove Protective Covers (If Applicable)
Some models incorporate removable protective lenses or silicone covers that shield the sensors from debris. Using the small screwdriver from the Midukit kit, gently unscrew any fasteners and lift the covers away from the sensor surface. It is essential to keep the screws in a safe container to avoid loss. If the robot does not have removable covers, proceed directly to the cleaning stage.
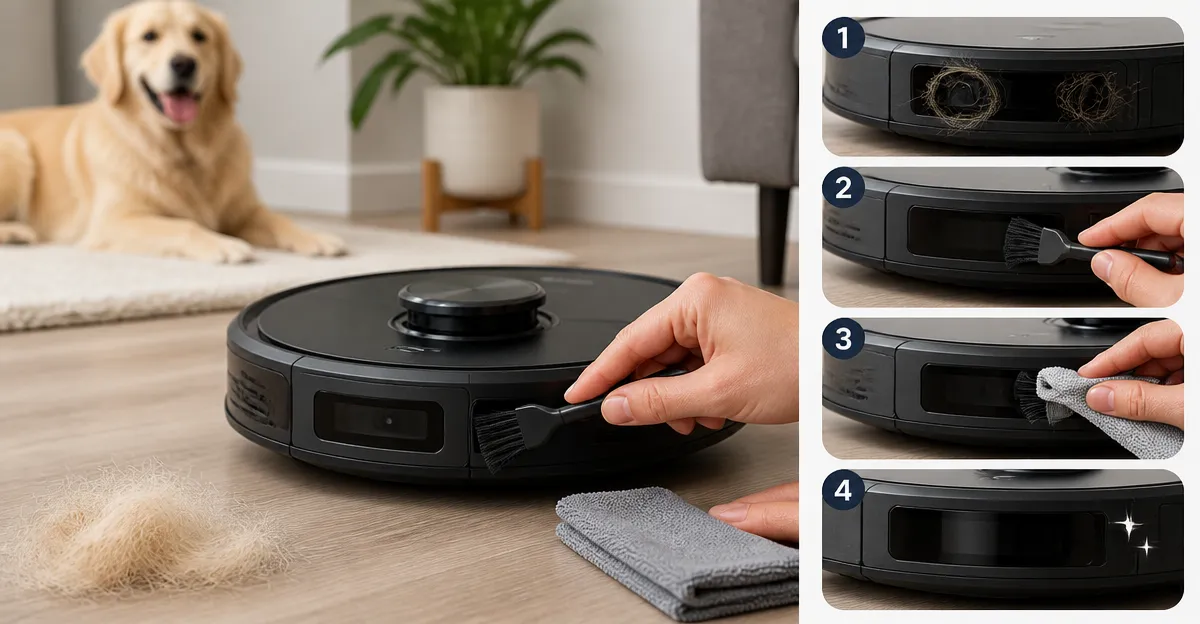
Step 4: Dislodge Bulk Hair with a Handheld Brush
Pet hair tends to form tangled clumps around the sensor housing. The YurMemo Handheld Vacuum Brush excels at loosening such accumulations because its high‑strength plastic body and premium bristles can reach into tight corners without scratching the sensor glass. One should gently sweep the brush around each sensor, rotating the robot to expose all sides. The brush removes the majority of hair, reducing the risk of scratching when finer tools are applied later. Price: $199.99; the brush is washable and wear‑resistant, ensuring long‑term utility.
Step 5: Clean Sensor Lenses with Precision Brushes and Cloth
After bulk hair removal, employ the fine‑bristle brushes from the Midukit Vacuum Cleaning Kit to target residual fibers and dust particles. The kit includes a double‑end cleaning brush, a small soft brush for delicate surfaces, and a nylon brush for general debris. Use the soft brush to gently brush the sensor lens in a circular motion, avoiding excessive pressure that could fracture the glass. Follow with the nylon brush to sweep away any remaining particles from the sensor housing. Finally, wipe the lens with the included microfiber cleaning cloth, applying a light, even stroke to achieve a streak‑free surface. This kit’s versatility makes it suitable for both sensor and roller maintenance, providing a cost‑effective solution at $8.99 with a 4.5/5.0 rating based on 139 reviews.
Step 6: Use Compressed Air for Fine Particles (Optional)
If microscopic dust remains after brushing, a short burst of compressed air can dislodge the particles without contact. Hold the canister at a safe distance (approximately 6 inches) and spray across the sensor array, allowing the airflow to carry away any lingering debris. One should avoid tilting the canister, as moisture can be expelled and potentially damage electronic components.
Step 7: Reassemble Protective Covers and Test
Replace any protective covers that were removed in Step 3, securing them with the original screws using the screwdriver from the Midukit kit. Verify that all fasteners are tightened but not over‑torqued, as excessive force may crack the sensor housing. Once reassembled, place the robot on its charging dock, power it on, and initiate a short cleaning cycle. Observe the robot’s navigation; smooth movement without unexpected stops indicates successful sensor cleaning.
Tips & Pro Tips
- Schedule sensor cleaning every two to three months, or more frequently in households with multiple shedding pets.
- Perform a visual inspection of the sensor lenses before each cleaning session to assess the level of buildup.
- When using the YurMemo Handheld Vacuum Brush, do not apply water directly to the bristles; instead, use a dry brush to prevent moisture from entering electronic compartments.
- Store the Midukit kit in a small zip‑lock bag to keep the brushes and cloths free from contamination between uses.
- If the robot exhibits intermittent navigation errors after cleaning, recalibrate the sensors according to the manufacturer’s instructions.
Troubleshooting
Problem: The robot continues to misread obstacles after cleaning.
Solution: Verify that no hair remains on the sensor edges, re‑clean with the soft brush, and ensure the protective lens is correctly seated.
Problem: Sensor lens appears cloudy despite cleaning.
Solution: Use a small amount of isopropyl alcohol on the microfiber cloth to gently polish the surface, then dry with a clean portion of the cloth.
Conclusion
By following this comprehensive maintenance routine, one can keep robot vacuum sensors free of pet hair, thereby preserving accurate navigation and optimal cleaning performance. Regular use of the YurMemo Handheld Vacuum Brush and the Midukit Vacuum Cleaning Kit simplifies the process and reduces wear on the device. Consistent sensor care not only extends the robot’s lifespan but also minimizes unexpected service interruptions, delivering reliable cleanliness for homes with beloved pets.
Products Mentioned in This Guide
Frequently Asked Questions
Why is it important to keep robot vacuum sensors clean when you have pets?
Pet hair can clog sensors, causing navigation errors and reduced cleaning efficiency, which shortens the vacuum’s lifespan.
How often should I clean the sensors on my robot vacuum?
Clean the sensors at least once a month, or after heavy shedding periods, to maintain reliable performance.
What tools are recommended for cleaning robot vacuum sensors and rollers?
Use a soft anti‑static microfiber cloth, precision cleaning brushes (e.g., Midukit Vacuum Cleaning Kit), and a handheld brush for larger hair accumulations.
Can I use liquid cleaners or alcohol on the sensors?
No; liquids can damage delicate components—stick to dry, lint‑free cloths and gentle brushes.
What are the signs that sensor blockage is affecting my robot vacuum’s performance?
Frequent bumping, missed spots, or erratic movement usually indicate clogged sensors from pet hair.