How to Maintain Robot Vacuum Brushes for Long‑Haired Pets — Remove Hair, Prevent Tangles, and Boost Suction
Introduction
Owners of long‑haired dogs or cats frequently discover that their robot vacuum loses suction more quickly than expected. The primary cause is the accumulation of hair on the main brush, side brush, and internal filters. This guide will teach the reader how to remove hair, prevent tangles, and restore suction performance. By following the procedures, one can extend the service life of the robot vacuum, reduce maintenance costs, and maintain a consistently clean home environment.
The reader will learn how to disassemble brush components safely, clean them using appropriate tools, replace worn parts with high‑quality replacements, and apply preventive measures that minimise future hair buildup. The information is valuable because it combines practical hands‑on instructions with evidence‑based product recommendations, allowing the reader to achieve professional‑grade results without specialised training.
What You Will Need
- A soft‑bristled cleaning brush or an old toothbrush
- Compressed air canister (optional)
- Micro‑fibre cleaning cloth
- Screwdriver (Phillips head, typically included in the kit)
- Rjnlsc Roomba Parts Kit – contains replacement brushes, filters, side brushes, and tools
Step 1 – Power Down and Position the Vacuum
Before commencing any maintenance, ensure that the robot vacuum is turned off and removed from its charging dock. Press and hold the power button for three seconds to guarantee a complete shutdown. Place the unit on a stable, flat surface such as a kitchen countertop, and position a soft towel underneath to protect the chassis from scratches.
This precaution prevents accidental activation of the motor while the brush assembly is exposed, reducing the risk of injury or damage to internal components.
Step 2 – Remove the Main Brush Assembly
Locate the release latch on the underside of the vacuum; it is typically a small lever or button that secures the main brush. Depress the latch while lifting the brush housing gently upward. The brush should detach without excessive force. If the latch is resistant, use the screwdriver from the Rjnlsc Roomba Parts Kit to loosen any retaining screw.
Removing the main brush provides direct access to the bristle and beater elements where most hair entanglement occurs.
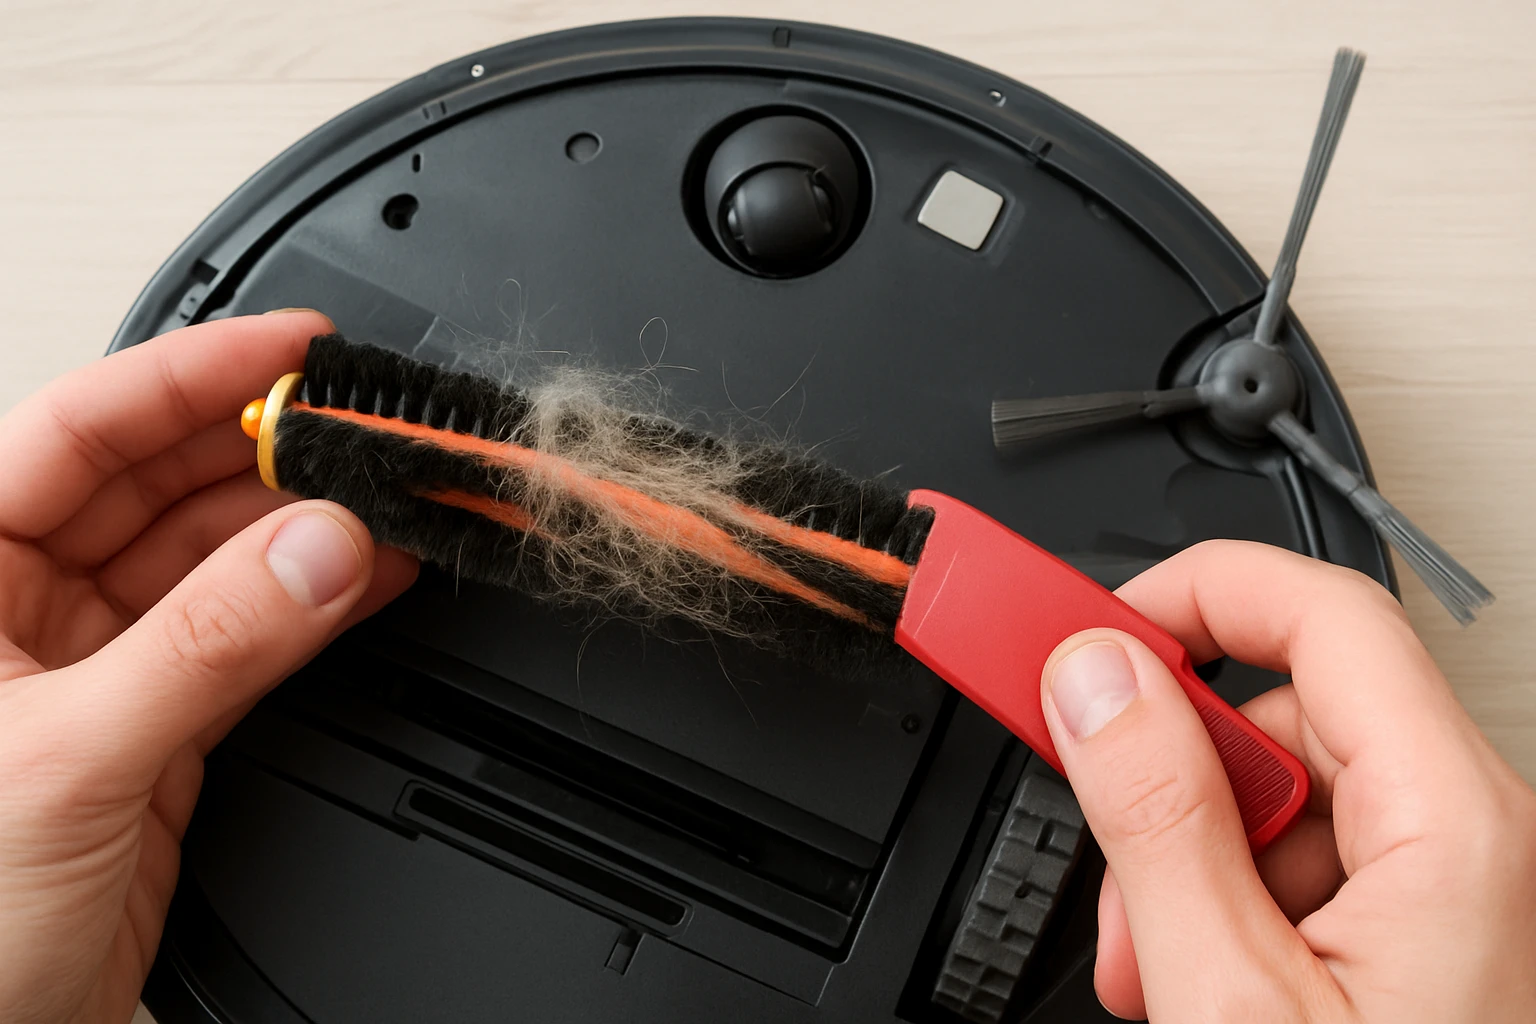
Step 3 – Dislodge Hair from the Bristle and Beater Brush
Hold the brush over a trash bin and use a soft‑bristled cleaning brush to loosen hair that is wrapped around the bristles. Rotate the brush slowly while applying gentle pressure to pull hair away from the core. For stubborn strands, submerge the brush in warm water for two to three minutes, then shake off excess water and allow it to air dry completely before reinstallation.
The warm‑water soak is recommended by the manufacturer because it relaxes the plastic fibers, making hair removal easier without compromising brush integrity.
Step 4 – Clean the Side Brush
The side brush is located on the front or side of the vacuum, depending on the model. Press the side‑brush release tab and pull the brush outward. Examine the bristles for hair clumps; use a toothpick or the provided cleaning tool from the Rjnlsc Roomba Parts Kit to extract hair that is trapped near the base.
If the side brush appears bent or misshapen, soak it briefly in warm water, straighten it gently, and allow it to dry. Properly maintained side brushes improve edge cleaning and reduce the likelihood of missed debris.
Step 5 – Replace Worn Filters
Locate the filter compartment, usually accessed by sliding a cover on the top of the unit. Remove the existing filters and inspect them for discoloration or permanent blockage. Replace each filter with a new one from the Rjnlsc Roomba Parts Kit. The kit provides six high‑efficiency filters that are compatible with both the 600 and 500 series models.
Each filter is constructed from durable PC material, offering a balance of airflow and particle capture. Replacing filters every two to four months, as recommended by the manufacturer, sustains optimal suction and prevents motor strain.
Step 6 – Reassemble the Brush Assembly
Insert the new bristle and beater brush into the housing, ensuring that the orientation matches the original configuration. Align the brush housing with the motor shaft and press down until the latch clicks into place. Re‑install the side brush by sliding it back into its slot until it locks securely.
Double‑check that all screws are tightened with the screwdriver supplied in the kit. Over‑tightening can strip threads, while under‑tightening may cause vibration during operation.
Step 7 – Perform a Test Run
Place the robot vacuum back onto its charging dock, power it on, and select a short cleaning cycle. Observe the brush rotation and listen for any abnormal noises. Verify that suction feels strong by checking the debris collection bin for a noticeable increase in captured hair.
If the vacuum operates smoothly, the maintenance procedure has been successful. If unusual sounds persist, revisit the brush alignment and ensure that no hair remains trapped in the motor housing.
Tips & Pro Tips
- Schedule a brush‑cleaning session every two weeks for households with multiple long‑haired pets; regular maintenance prevents severe tangles.
- Use a lint‑free micro‑fibre cloth to wipe the exterior of the vacuum after each cleaning cycle; this reduces dust accumulation on sensors.
- When soaking brushes, add a few drops of mild dish soap to the water; this helps dissolve pet oils that can cause hair to adhere.
- Store replacement brushes and filters in a dry, sealed container to protect them from moisture before installation.
- If the side brush frequently bends, consider installing a reinforced side‑brush model, which is also available in the Rjnlsc Roomba Parts Kit.
Troubleshooting
Problem: Reduced Suction After Maintenance
Cause: A filter may not be seated correctly, or hair may still be lodged in the brush housing.
Solution: Power off the unit, remove the filter compartment, and reinstall the filter ensuring a snug fit. Then re‑examine the brush for any remaining hair and repeat the cleaning process if necessary.
Problem: Brush Does Not Rotate
Cause: The brush may be installed upside‑down or the motor gear may be obstructed.
Solution: Remove the brush assembly, verify the orientation markings, and reinstall. Inspect the gear area for debris and clear any obstruction with a compressed‑air canister.
Conclusion
Maintaining robot vacuum brushes in a home with long‑haired pets requires diligent cleaning, timely replacement of wear items, and the use of high‑quality components. By following the step‑by‑step instructions, the reader can remove hair, prevent tangles, and boost suction performance, thereby extending the service life of the device. Regular maintenance also reduces the need for costly professional repairs and ensures a consistently clean living space.
Implement the recommended schedule, utilise the tools provided in the Rjnlsc Roomba Parts Kit, and enjoy reliable cleaning results for months to come.
Products Mentioned in This Guide
Frequently Asked Questions
Why does my robot vacuum lose suction when I have long‑haired pets?
Hair builds up on the main brush, side brush, and filters, blocking airflow and reducing suction power.
What tools are recommended for cleaning robot vacuum brushes?
Use a soft‑bristled cleaning brush or an old toothbrush and, optionally, a compressed‑air canister to blow out debris.
How often should I clean the brushes and filters on a robot vacuum with a furry pet?
Inspect and clean the brushes and filters at least once a week, or after every 5‑7 cleaning cycles if hair buildup is heavy.
Can I replace worn brushes myself, and what should I look for?
Yes; choose high‑quality replacement brushes that match the original size and bristle type, and ensure they fit securely in the brush housing.
What preventive measures help keep hair from tangling on the robot vacuum?
Regularly remove loose hair from floors, use a pet‑hair specific cleaning mode, and keep the vacuum’s brush compartment free of knots by cleaning after each use.