How to Clean Your Vacuum After Grooming Pets: Quick, Easy Steps to Remove Pet Hair, Odors & Prevent Clogs
Introduction
Pet owners understand that grooming creates a substantial amount of hair, dander, and odor that quickly accumulates in a vacuum cleaner. One poorly maintained vacuum can lose suction, develop unpleasant smells, and even suffer mechanical failures due to clogged filters. This guide explains how to clean a vacuum after grooming sessions, why each step matters, and which tools can make the process faster and more effective. By following these instructions, readers will extend the life of their vacuum, maintain optimal performance, and keep their homes healthier.
What You'll Need
- Soft brush or microfiber cloth
- Compressed air canister (optional)
- Cleaning solution for filters (mild dish soap and warm water)
- Replacement HEPA filter (if needed)
- Vacuum accessories for detail cleaning
- Dryer‑vent cleaning brush set for tight crevices
- Micro‑cleaning kit for wet/dry vac attachments
All of the recommended accessories are available on Amazon and are listed in the Products Mentioned section.
Step 1: Disconnect Power and Prepare the Work Area
Before any cleaning begins, always unplug the vacuum to eliminate the risk of electric shock. Place the unit on a stable surface with ample lighting so that all components are visible. Remove the main brush roll and any detachable pods, setting them aside on a clean towel. This preparation ensures that each part can be accessed without obstruction, reducing the chance of missed hair or debris.
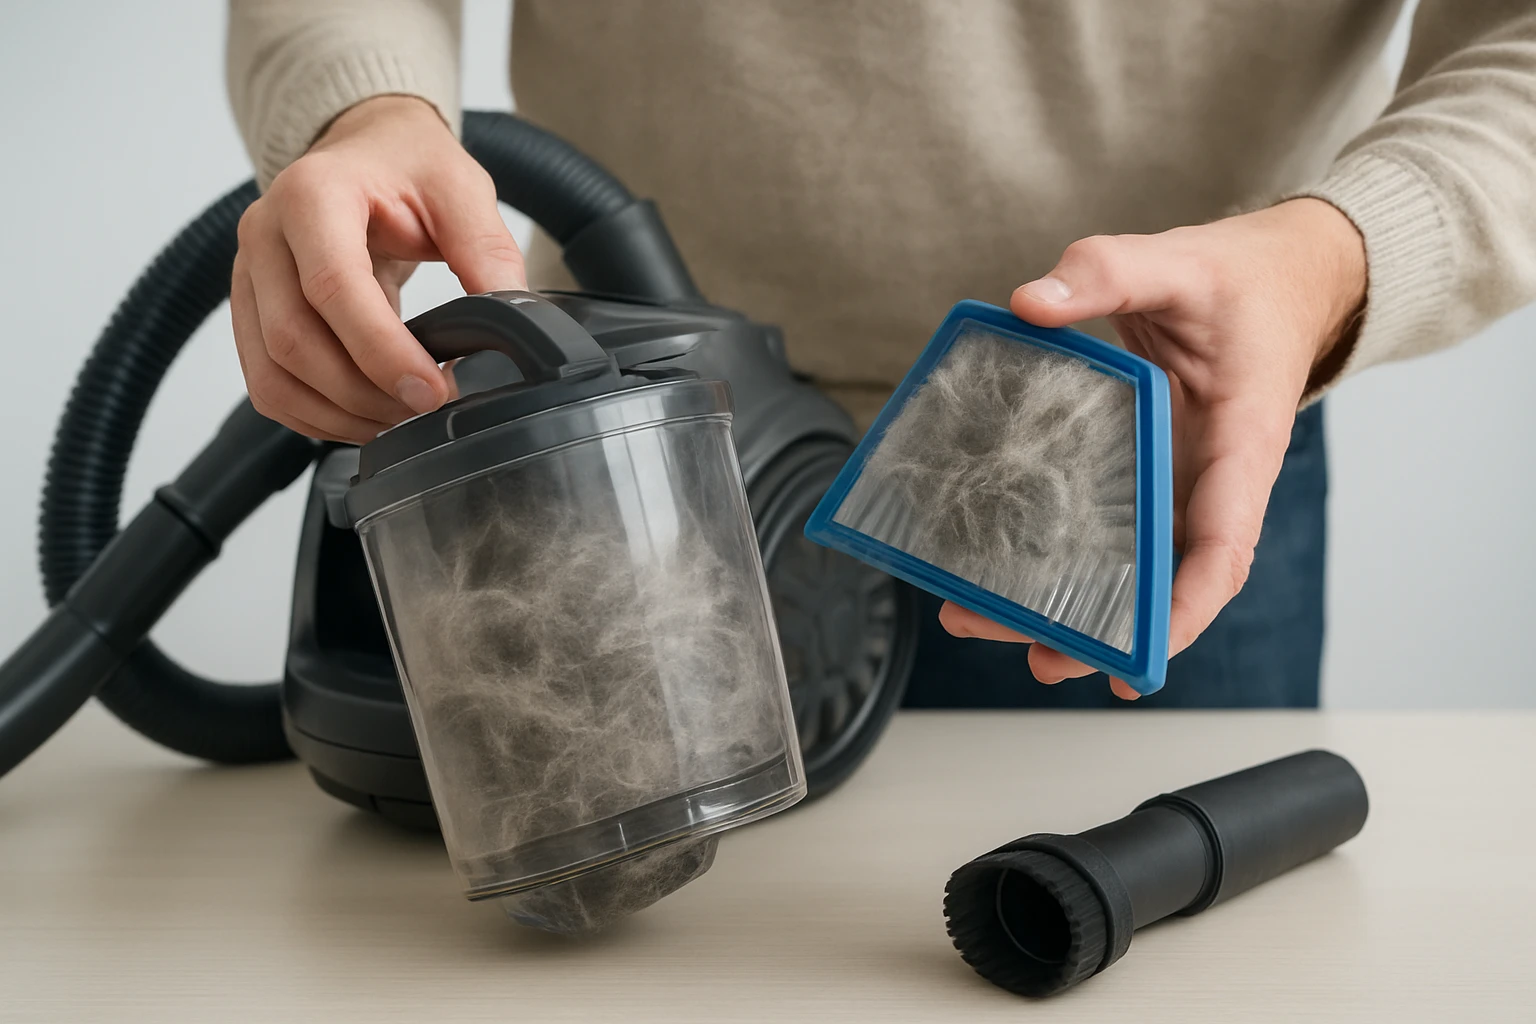
Step 2: Empty the Dirt Container and Remove Large Debris
Open the dirt container and empty its contents into a trash bin. Use a soft brush or the included crevice tool to dislodge any clumps of hair that cling to the walls. For vacuums with a detachable pod, such as the Shark Navigator Lift-Away, lift the pod away and tap it gently over the trash to release trapped hair. This step prevents larger particles from entering the filter later in the process.
Key product details: Price $199.99, Rating 4.4/5 from 41,749 reviews. The lift‑away functionality allows easy access to hard‑to‑reach areas, making it ideal for this step.
Step 3: Clean the Brush Roll and Attachments
Remove the brush roll from the vacuum head and cut away any tangled hair with scissors or a seam ripper. Use the Bissell Pet Hair Eraser Lift‑Off to clean the brush roll quickly; its tangle‑free brush roll is designed to release hair without damaging the bristles. After removing hair, rinse the brush roll under warm water with a mild detergent, then allow it to air dry completely before reinstalling.
Key product details: Price $179.99, Rating 4.4/5 from 2,439 reviews. The powerful suction and detachable pod make it especially effective for deep cleaning of brush components.
Step 4: Clean and Replace Filters
Locate the HEPA filter and any pre‑filters within the vacuum. Gently tap the filter to release loose dust, then rinse it under lukewarm water if the manufacturer permits. The Shark Navigator Lift‑Away features an anti‑allergen complete seal with a HEPA filter that traps 99.9% of particles; keeping this filter clean maintains that performance level. If the filter appears worn or does not dry within an hour, replace it with a new HEPA filter of the same specifications.
Key product details: The anti‑allergen seal works with a HEPA filter to trap microscopic allergens, essential for households with pets that shed heavily.
Step 5: Address Hard‑to‑Reach Crevices and Vents
Pet hair often accumulates in narrow vents, dryer ducts, and the interior of upholstery tools. The TAICHODEER Dryer Vent Cleaning Brush Set includes flexible stainless‑steel shafts that bend into tight spaces, allowing you to remove lint and hair from vents that are otherwise inaccessible. Use the built‑in tweezers to extract stubborn strands from crevices in the vacuum housing.
Key product details: Price $9.99, Rating 4.5/5 from 151 reviews. The set’s multipurpose design also makes it useful for cleaning the vacuum’s internal air pathways.
Step 6: Reassemble, Test, and Perform a Final Inspection
Once all components are dry, reattach the brush roll, replace the filters, and reinsert the detachable pod. Plug the vacuum back in and run it on a low‑suction setting for a few seconds to verify that airflow is unobstructed. Inspect the exterior for any remaining hair and wipe the housing with a microfiber cloth dampened with a mild cleaning solution. A final inspection ensures that no debris was missed and that the vacuum is ready for the next grooming session.
Tips & Pro Tips
- Perform a quick clean after each grooming session to prevent hair from hardening inside the vacuum.
- Use the CRAFTSMAN Micro‑Cleaning Vac Kit to reach deep inside the hose and nozzle; its angled extension wand is ideal for detailed work.
- Store the vacuum in a dry area to avoid moisture buildup that can encourage mold growth on filters.
- Replace HEPA filters every 6‑12 months depending on usage intensity; pets that shed heavily may require more frequent changes.
- When cleaning the brush roll, avoid using harsh chemicals that could degrade the bristles.
Troubleshooting
| Problem | Possible Cause | Solution |
|---|---|---|
| Reduced suction | Clogged hose or filter | Detach the hose, use the CRAFTSMAN Micro‑Cleaning Kit to clear debris, and replace the filter if necessary. |
| Unpleasant odor | Dirty filter or brush roll | Clean the HEPA filter thoroughly and wash the brush roll with warm soapy water; allow both to dry completely. |
| Brush roll does not rotate | Brush‑roll shutoff engaged | Check the brush‑roll shutoff switch and ensure it is set to the appropriate floor type. |
Conclusion
Regular maintenance of a vacuum after grooming pets preserves suction power, eliminates odors, and prevents costly clogs. By following the six detailed steps, using the recommended accessories, and applying the provided tips, pet owners can keep their cleaning equipment operating at peak efficiency. A well‑maintained vacuum not only protects the investment but also contributes to a healthier indoor environment for both humans and animals.
Products Mentioned in This Guide
Frequently Asked Questions
How often should I clean my vacuum after grooming my pets?
Clean the vacuum after each grooming session or at least once a week if you groom frequently to prevent hair buildup and odors.
What is the best way to remove pet hair from the vacuum brush roll?
Detach the brush roll, use a soft brush or microfiber cloth to pull out hair, and tap the roll gently to dislodge any remaining strands.
Can I use compressed air to clean vacuum filters?
Yes, short bursts of compressed air can blow loose debris from filters, but follow up with a wash using mild soap and water for thorough cleaning.
When should I replace the HEPA filter in my vacuum?
Replace the HEPA filter when it appears darkened, clogged, or after 6‑12 months of heavy pet use, whichever comes first.
How do I prevent unpleasant odors from building up in my vacuum?
Regularly clean the dust bin, wash filters, and wipe the hose and attachments with a mild cleaning solution to eliminate trapped pet odors.