How to Upgrade Non-Voiding Robot Vacuum Brushes for Pet Hair: Step-by-Step DIY to Eliminate Tangles and Improve Cleaning
Introduction
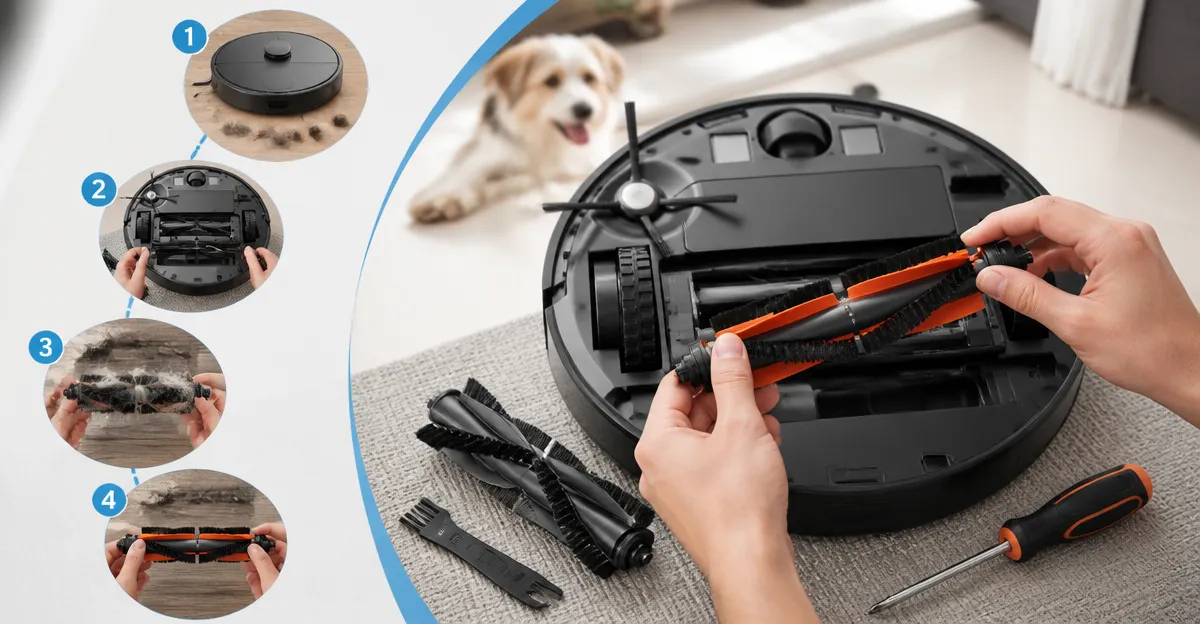
In households with pets, robot vacuums often struggle with hair tangles that reduce suction and shorten brush life. This guide teaches the reader how to replace side and main brushes with high‑quality aftermarket parts, thereby restoring peak performance. The instructions are written for an intermediate audience who is comfortable handling small components but may need clarification on compatibility. By following each step, one will achieve a quieter, more efficient cleaning cycle and extend the service interval of the robot vacuum.
What You'll Need
- Replacement side brushes (compatible with your robot model)
- Replacement main brush or roller set
- Mini screwdriver set (often included in brush kits)
- Soft cleaning cloth and warm water
- Protective gloves (optional)
All of the recommended products are available on Amazon and are linked at their first mention. The tools listed are sufficient for most iRobot Roomba 500/600 series and Shark AI models.
Step 1: Prepare the Robot Vacuum
Begin by powering off the robot and removing the battery if the model permits easy removal; this prevents accidental activation during disassembly. Place the vacuum on a clean, flat surface and locate the side‑brush housing, which is typically on the right side of the unit. Using the included screwdriver from the Roomba Brush Kit, loosen the retaining screw without applying excessive force. This preparation step ensures a safe environment for brush removal and reduces the risk of damaging internal sensors.
Step 2: Remove Existing Brushes
Gently pull the side brush away from its mounting slot; most brushes are held in place by a single screw and a snap‑in tab. For Shark models, the side brush releases with a simple snap, as described in the Shark AI Side Brush package, which requires no tools. If the brush appears stuck, soak it in warm water for a few minutes to soften any debris that may be causing resistance. Once the side brush is free, set it aside and repeat the process on the opposite side if your robot uses dual side brushes.
Step 3: Clean the Brush Housing and Sensors
With the brushes removed, use a soft cloth dampened with warm water to wipe away dust, hair, and residue from the housing and nearby sensors. Avoid using abrasive materials that could scratch the plastic or interfere with infrared sensors. Allow the cleaned area to air‑dry for at least two minutes; moisture can affect the motor if the robot is powered on too soon. This cleaning stage improves the adhesion of the new brushes and prevents future tangles caused by residual hair.
Step 4: Install New Side Brushes
Select the appropriate side brush set for the robot model. For iRobot Roomba 500/600 series, the Roomba Brush Kit provides two bristle brushes, six side brushes, and the necessary screws. Each brush features a sturdy PC construction and a flexible beater design that mimics the original OEM performance. Insert the new side brush into the slot, ensuring the bristles face forward, and secure it with the supplied screw using the mini screwdriver. The kit is priced at $19.49, carries a 4.7‑star rating from 5,007 reviews, and includes cleaning tools that simplify future maintenance.
For Shark AI models, the Shark AI Side Brush pack contains four brushes that snap into place without tools. The brushes are crafted from durable polymer and are recommended for replacement every 2‑3 months to maintain optimal edge‑sweeping performance. Priced at $5.99 with a 4.5‑star rating from 1,529 reviews, this pack offers a cost‑effective solution for frequent pet‑hair accumulation.
Step 5: Replace the Main Brush or Roller
The main brush, also known as the roller, is responsible for agitating carpet fibers and dislodging hair. For Shark AI vacuums, the Shark AI Main Brush Pack includes three brushrolls with soft bristles and flexible silicone fins that prevent hair from wrapping around the roll. Each brushroll combines gentle bristles with anti‑tangle silicone, delivering strong pickup while protecting delicate flooring. The pack is priced at $19.99, holds a 4.5‑star rating from 1,035 reviews, and provides enough spares for several months of use.
If the robot is an iRobot Roomba, the main brush can be refreshed using the same Roomba Brush Kit, which includes two beater brushes that serve as the primary agitators. The beater brushes are made from high‑impact PC and are engineered to fit precisely, ensuring the motor receives consistent torque. By replacing both side and main brushes, one eliminates the common hair‑tangle issue that plagues pet owners.
Step 6: Reassemble and Test the Vacuum
After installing the new brushes, reattach any screws that were removed and verify that each brush spins freely without wobble. Re‑insert the battery, power on the robot, and place it on a low‑pile carpet or hardwood floor for a short cleaning cycle. Observe the brush rotation and listen for any unusual noises; smooth operation indicates a successful installation. Finally, check the dustbin after the cycle to confirm that suction has improved and that hair is being collected efficiently.
Tips & Pro Tips
- Schedule brush replacements every 2‑4 months for Roomba models and every 2‑3 months for Shark AI models to prevent performance loss.
- Soak side brushes in warm water for 2‑3 minutes if they arrive bent; this restores their shape without compromising durability.
- Keep a spare set of side brushes and a main brush in a drawer; this reduces downtime when a brush fails unexpectedly.
- Use the cleaning tool included in the Roomba Brush Kit to remove hair from the bristles after each cleaning cycle.
Troubleshooting
Brush does not spin: Verify that the screw is tightened securely and that the brush is seated correctly in the snap‑in slot. Misalignment can cause the motor to stall.
Robot leaves streaks on hard floors: Ensure the side brushes are oriented with the bristles facing forward; reversed orientation can push debris rather than collect it.
Excessive noise after replacement: Check for any loose debris trapped between the brush housing and the motor shaft. Remove the brush, clean the area, and reinstall.
Conclusion
By following this detailed guide, the reader can replace worn side and main brushes with reliable aftermarket parts, thereby eliminating hair tangles and restoring optimal suction. The recommended products provide a balance of affordability and performance, as demonstrated by their strong customer ratings and comprehensive feature sets. Regular maintenance, combined with the use of quality replacement brushes, will extend the service life of the robot vacuum and keep pet‑laden homes spotless.
Products Mentioned in This Guide
Frequently Asked Questions
Can I replace the side and main brushes on my robot vacuum to handle pet hair better?
Yes, aftermarket brushes designed for pet hair can be swapped in to reduce tangles and restore suction.
What tools are required for the brush upgrade?
A mini screwdriver (often included in the brush kit) and a soft cloth are sufficient; gloves are optional.
Are the recommended brushes compatible with iRobot Roomba 500/600 and Shark AI models?
The guide lists brushes that fit those series, but always verify the model number before purchasing.
How often should I replace robot vacuum brushes when cleaning pet hair?
Replace side brushes every 3‑4 months and the main roller every 6‑12 months, depending on hair volume.
Will upgrading to pet‑hair brushes improve cleaning performance?
Upgraded brushes reduce hair buildup, leading to quieter operation and stronger suction.