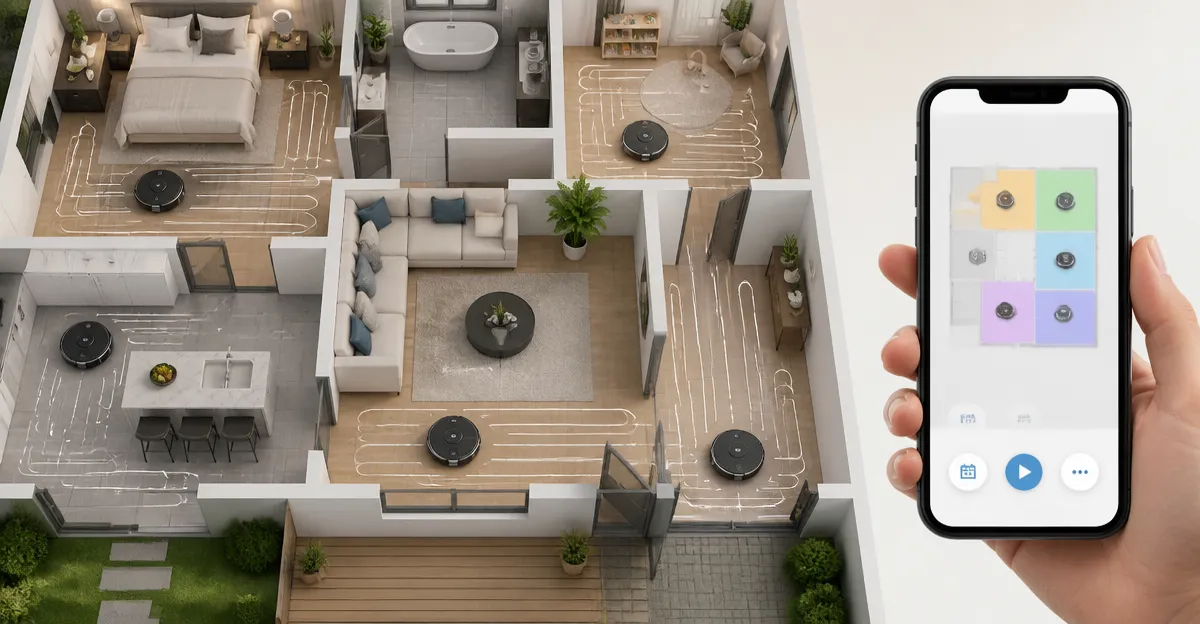
How to Run Multiple Robot Vacuums in One Home: Step‑by‑Step Guide to Scheduling, Zoning & Smart Integration
Introduction
One household may require more than a single robot vacuum to maintain cleanliness across multiple floors, pet‑friendly zones, and high‑traffic areas. This guide will teach the reader how to coordinate several autonomous cleaners, create effective cleaning zones, and integrate them with existing smart home ecosystems. By following the step‑by‑step instructions, one will achieve consistent results while avoiding conflicts between devices. The value of mastering these techniques lies in reduced manual labor, extended device lifespan, and a healthier living environment.
What You'll Need
- Two or more compatible robot vacuums (e.g., iRobot Roomba series)
- Wi‑Fi network with sufficient bandwidth for simultaneous device communication
- Smartphone or tablet with the manufacturer's mobile app installed
- Virtual wall or barrier devices to define zones (e.g., TZRONG Dual‑Mode Virtual Wall)
- Optional: Smart plug, voice assistant (Amazon Alexa, Google Assistant), and floor plan mapping tool
Step 1: Assess the Home Layout and Identify Cleaning Zones
The first major step is to evaluate the floor plan and decide where each robot vacuum will operate most efficiently. One should map each level, noting high‑traffic corridors, pet‑prone rooms, and areas that require frequent attention such as kitchens and entryways. By segmenting the home into logical zones, the user can assign specific vacuums to each zone, preventing overlap and redundant cleaning cycles. This assessment also informs the placement of virtual barriers that will be discussed in later steps.
Step 2: Prepare the Network and Ensure Reliable Connectivity
A stable Wi‑Fi connection is essential because each robot vacuum communicates with the cloud and the mobile app for scheduling and status updates. One should position the router centrally or use a mesh system to guarantee signal strength in every room where a robot will operate. It is advisable to assign static IP addresses to each vacuum within the router settings; this prevents IP conflicts when multiple devices connect simultaneously. After configuring the network, verify that each vacuum appears online in its respective app.
Step 3: Install the Manufacturer's Apps and Register Each Device
Each robot vacuum typically requires a dedicated mobile application for firmware updates, map management, and scheduling. One must download the appropriate app for each model, create a user account, and follow the on‑screen instructions to pair the device with the home Wi‑Fi network. During registration, the app will request a name for the vacuum; using descriptive names such as "Roomba‑Living‑Room" or "Roomba‑Downstairs" simplifies later scheduling. Once registration is complete, the app will display the current map of the environment.
Step 4: Create Individual Cleaning Schedules
With the devices registered, the next step is to set up cleaning schedules that do not conflict. One should allocate distinct time windows for each vacuum, for example, scheduling the living‑room robot at 9:00 AM and the hallway robot at 9:30 AM. Staggered schedules prevent two vacuums from attempting to occupy the same corridor simultaneously, which could cause navigation errors. The apps typically allow daily, weekly, or custom recurrence patterns; selecting the appropriate pattern ensures consistent coverage without manual intervention.
Step 5: Define Virtual Boundaries Using a Dual‑Mode Virtual Wall
Physical barriers are necessary when the user wants to restrict a robot to a specific area or prevent it from entering a sensitive zone such as a home office. The TZRONG Dual‑Mode Virtual Wall provides two operational modes that address both needs. In Halo mode, the device emits a four‑foot infrared ring that creates a temporary perimeter, ideal for keeping a vacuum out of a child's play area during playtime. In Beam mode, the device projects a ten‑foot infrared beam that can guide a vacuum into a designated cleaning corridor, useful for directing a second robot along a narrow hallway while the first cleans the adjacent living room.
The virtual wall is compatible with most iRobot Roomba models from the e, i, and S series, and it includes a 30‑day refund policy and a twelve‑month warranty, providing confidence in the purchase. At a price of $15.99 and a rating of 4.3 out of 5 stars from 41 reviews, the device offers a cost‑effective solution compared to purchasing additional robots solely for zoning purposes. To use the virtual wall, one places the device on a flat surface, selects the desired mode via the toggle switch, and observes the flashing light pattern that confirms activation.
Step 6: Integrate with Smart Home Assistants
Voice assistants such as Amazon Alexa or Google Assistant enable hands‑free control of multiple robot vacuums. One should enable the manufacturer's skill or action within the voice assistant app, then link each vacuum account to the assistant. After linking, commands like "Alexa, start Roomba‑Living‑Room" or "Hey Google, pause Roomba‑Downstairs" become possible. This integration also allows the creation of routines that trigger cleaning when the user leaves the house or after a specific event, such as the detection of motion by a security camera.
For users who prefer granular control, smart plugs can be employed to power on or off a vacuum at scheduled times, effectively acting as an additional safety layer. By connecting the vacuum charger to a smart plug, the user can ensure that a robot does not start cleaning during a designated quiet period, even if the schedule in the app is inadvertently triggered.
Step 7: Optimize Map Management and Zone Cleaning
Most modern robot vacuums generate a digital map of the environment after the first few cleaning cycles. One should access the map within the app and use the built‑in zone editing tools to create virtual rooms or exclusion zones. By assigning each robot a specific set of zones, the user can guarantee that the devices operate in non‑overlapping areas. For example, the downstairs robot can be assigned to the kitchen, dining room, and hallway, while the upstairs robot receives the bedroom and study.
If the app supports multi‑room cleaning, the user can trigger a single robot to clean multiple zones in one session, reducing the need for a second device in low‑traffic homes. However, in larger homes with multiple floors, maintaining separate robots for each floor remains the most efficient approach.
Step 8: Perform Routine Maintenance and Firmware Updates
Regular maintenance ensures that each robot vacuum operates at peak efficiency. One should empty the dustbin after each cleaning cycle, clean the filter monthly, and inspect the brush roll for tangled hair or debris. Firmware updates delivered through the app often contain navigation improvements and bug fixes; installing these updates promptly reduces the likelihood of navigation errors when multiple devices share the same Wi‑Fi network.
Additionally, the TZRONG Dual‑Mode Virtual Wall should be tested periodically to confirm that both Halo and Beam modes function correctly, as infrared emitters can degrade over time. Replacing the unit is straightforward, and the manufacturer's warranty covers defects within twelve months.
Tips & Pro Tips
- Label each robot with a distinct color or sticker to avoid confusion when manually relocating them.
- Use the virtual wall's Halo mode during gatherings to keep a robot out of a dining area, then switch to Beam mode for post‑event cleanup.
- Enable "Do Not Disturb" hours in the app to prevent cleaning during nighttime or work‑from‑home periods.
- Synchronize cleaning schedules with the household's occupancy patterns; for example, schedule a vacuum to run after the last family member leaves for the day.
- Consider creating a dedicated Wi‑Fi SSID for IoT devices to reduce interference from streaming or gaming traffic.
Troubleshooting
Problem: Two vacuums attempt to clean the same corridor and become stuck.
Solution: Verify that the cleaning schedules are staggered by at least fifteen minutes. If overlap persists, place a TZRONG Dual‑Mode Virtual Wall in Halo mode at the corridor entrance to create a temporary barrier.
Problem: A robot does not recognize the virtual wall in Beam mode.
Solution: Ensure that the infrared beam is not obstructed by furniture and that the device is positioned at a height of 4–6 inches above the floor. Clean the emitter surface with a soft cloth to remove dust.
Problem: Wi‑Fi connectivity drops when multiple vacuums are active.
Solution: Upgrade the router firmware, enable Quality of Service (QoS) for IoT devices, or add a mesh node near the area with the highest device concentration.
Conclusion
By following the systematic approach outlined in this guide, one can successfully run multiple robot vacuums in a single home without interference. The reader has learned how to assess the layout, configure network and app settings, create staggered schedules, define zones with a dual‑mode virtual wall, integrate voice assistants, and maintain optimal performance. Implementing these strategies will result in a cleaner home, reduced manual effort, and extended device longevity. One is encouraged to begin the process today and enjoy the convenience of coordinated autonomous cleaning.
Products Mentioned in This Guide
Frequently Asked Questions
How can I prevent multiple robot vacuums from cleaning the same area simultaneously?
Assign each vacuum a distinct floor or zone in the app and enable ‘do not disturb’ or scheduling rules that stagger their run times.
What is the best way to set up cleaning zones for several robot vacuums?
Use virtual walls or barrier devices to demarcate zones, then map each area in the manufacturer’s app and bind a specific vacuum to its designated zone.
Do I need a separate Wi‑Fi network for each robot vacuum?
No, a single robust Wi‑Fi network with enough bandwidth can support multiple vacuums; just ensure the router can handle concurrent connections.
How do I integrate multiple robot vacuums with a smart home system like Alexa or Google Home?
Link each vacuum’s account to the smart‑home platform, then create separate voice commands or routines for each device in the app.
What accessories help manage multiple robot vacuums in one home?
Virtual walls, dual‑mode barriers, and dedicated charging stations keep vacuums separated and ensure they return to the correct dock.